Particle generators
As important for a Geant4 simulation as the geometry, materials, and physics list, is the initial set of particles to be “let loose” in the simulation each event. These source particles are called primary particles in Geant4 terminology, and any particle generated indirectly as a result of the simulation of the interactions between particles and the material of the simulation geometry are accordingly denoted secondary particles. For the case of many neutron scattering studies, an event might consist of a single primary neutron, but it is certainly possible (and normal) for other types of studies to have events with multiple primary particles.
Whenever creating a new primary particle, a generator module must fully define its initial state, which typically means choosing:
Particle type (neutron, gamma, e-, …)
Kinetic energy (or wavelength)
Position (must be within the world volume of the simulation geometry)
Direction
Other parameters which can be set, but often are not, are:
Weight (normally only different from 1 when some clever setup involving event biasing is contemplated)
Polarisation (when not mentioned, it normally means that the particle is generated unpolarised)
Time (when not mentioned, it normally means that the particle is generated at \(t=0\))
In dgcode, generators are implemented as separate specialised modules with configurable parameters in the same manner as geometry modules are. The main differences are firstly that generator modules are very often reusable across many specific projects or studies, while this is more rarely seen for geometry modules. Secondly, as we shall see below, generator modules can be implemented purely in just a few lines of Python code if desired.
Configuration
Picking a generator module in a sim-script is done in the
same manner as picking a geometry module: one imports the desired generator
module, instantiates a given generator instance (called gen below), and
optionally changes the default value of one or more of the parameters available
for the given generator module. Of course, those values can again be overwritten
from the command line should the user of the simulation script so desire. In
the example below, the author of the simulation script in question has decided
to use the SimpleGen generator
module from the G4StdGenerators package:
#!/usr/bin/env python

import G4GeoTriCorder.GeoTriCorder as geomodule
geo = geomodule.create()

import G4StdGenerators.SimpleGen as genmodule
gen = genmodule.create()
gen.particleName = 'neutron'
gen.neutron_wavelength_aangstrom = 2.2

import G4Launcher
launcher = G4Launcher(geo,gen)
launcher.go()
If the above script is located in a folder TriCorder/scripts/sim (i.e. in
the scripts/ sub-dir of a package called TriCorder), it will end up as a
command sb_tricorder_sim (avid readers of the present wiki might recognise
the TriCorder example from the instructions for creating a new simulation
project). One can see the available parameters by running the
command with -p (if you forget that the flag is -p you can always run
with -h first for usage instructions):
$> sb_tricorder_sim -p
ParticleGenerator[G4StdGenerators/SimpleGen]:
  [dbl] fixed_x_meters = 0
  [dbl] fixed_y_meters = 0
  [dbl] fixed_z_meters = -0.1
  [dbl] fixed_energy_eV = 0.016901696364378
  [dbl] neutron_wavelength_aangstrom = 2.2
  [dbl] fixed_xdir = 0
  [dbl] fixed_ydir = 0
  [dbl] fixed_zdir = 1
  [str] particleName = "neutron"
To understand what the different parameters are for, there are several strategies:
Read on further down this page where all the generators from the G4StdGenerators package are mentioned.
Guess based on the hopefully very descriptive names of the parameters.
Supply the
--datavieweror--aimdataviewerflag to generate and visualise few or many events in a 3D viewer, and see how the tracks are generated in the geometry (read more here):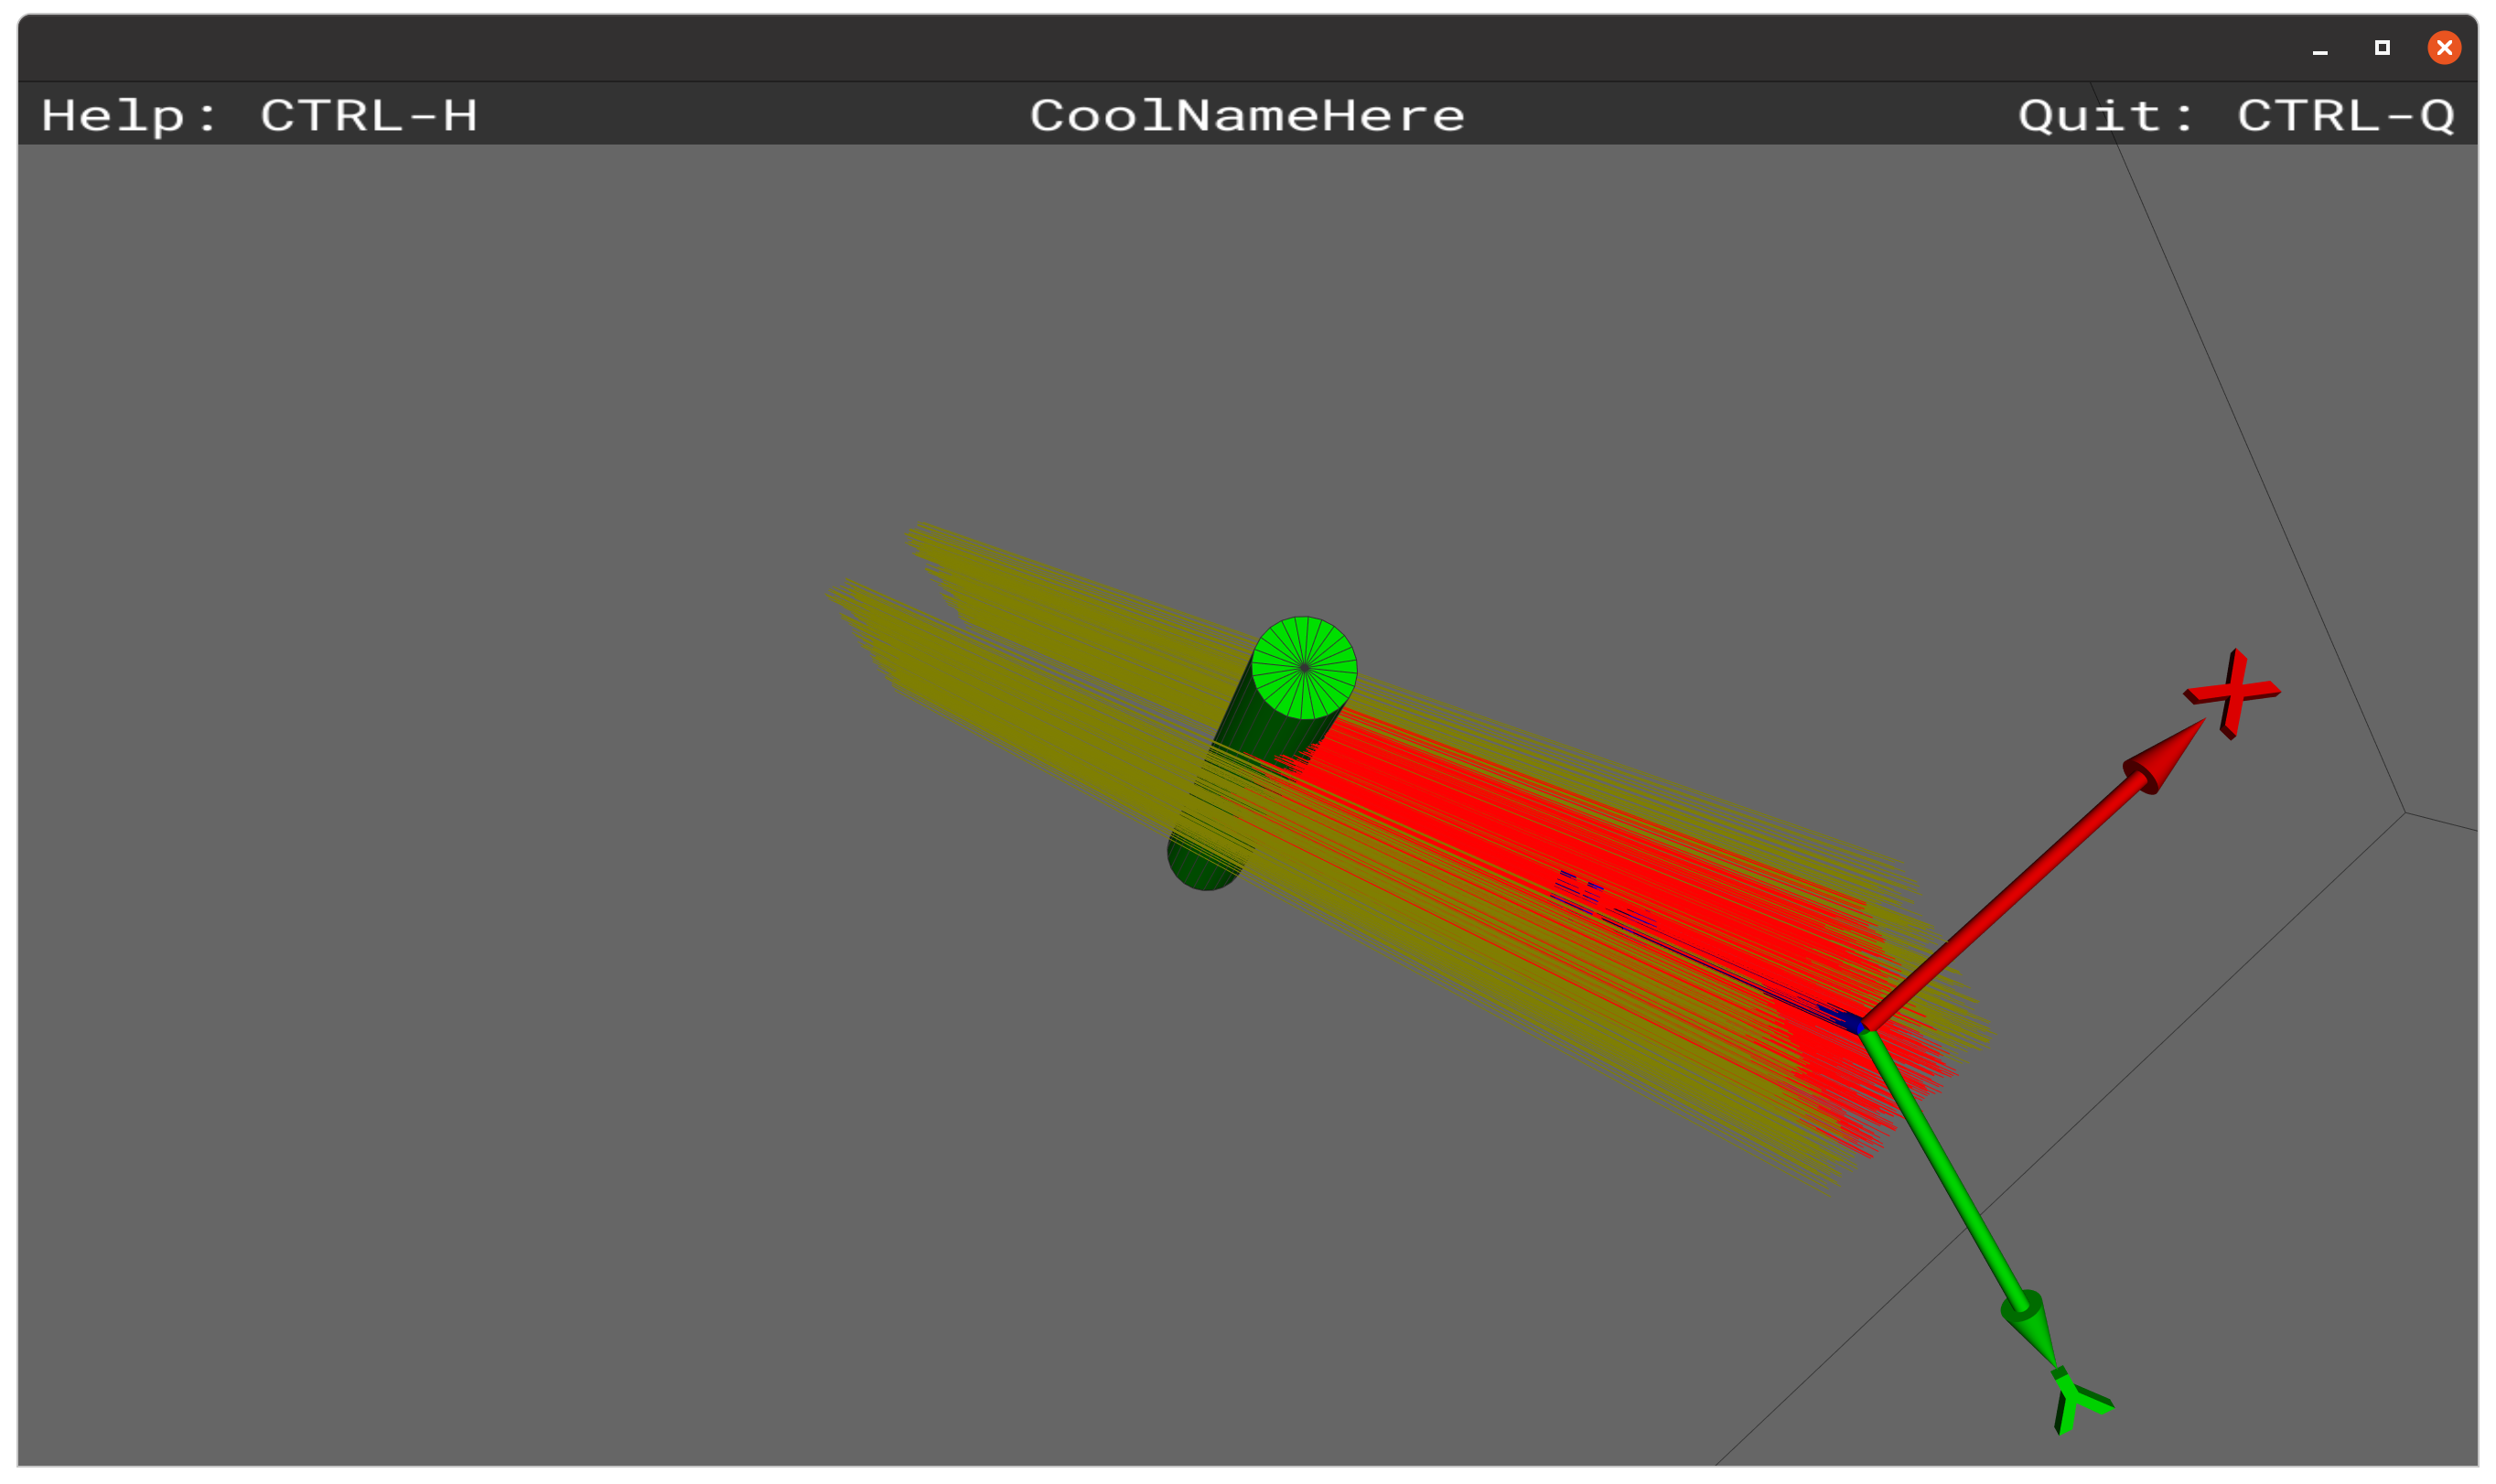
Supply the
--verboseflag to generate a few events and print out some info about them.Locate the source code of the generator module in question and try to understand what it does, or ask its author.
Investigate generator without geometry
If you are not working with a particular geometry, and want to investigate a
given generator module, it is possible to do so even without a sim-script, by using the sb_g4utils_querygenerator command (in the same
way that the sb_g4utils_geodisplay can be used to visualise a geometry
module without a generator). Get full usage instructions by:
$> sb_g4utils_querygenerator -h
Note in particular that by adding the -v and -n<NEVTS> flags, one can
launch the visualisation to see some events generated with it in a empty
geometry.
Standard generators
Three standard generators are provided in the G4StdGenerators package.
SimpleGen: A very simple generator, producing 1 primary particle each event, allowing the user to modify position, direction and energy (or, for neutrons, wavelength – but not both wavelength and energy at the same time):$> sb_g4utils_querygenerator -g G4StdGenerators.SimpleGen ParticleGenerator[G4StdGenerators/SimpleGen]: [dbl] fixed_x_meters = 0 [dbl] fixed_y_meters = 0 [dbl] fixed_z_meters = 0 [dbl] fixed_energy_eV = 100 [dbl] neutron_wavelength_aangstrom = 0.028601435349225 [dbl] fixed_xdir = 0 [dbl] fixed_ydir = 0 [dbl] fixed_zdir = 1 [str] particleName = "neutron"
FlexGen: The big-brother ofSimpleGenwhich provides more parameters and features. Note that this is a strict super-set of theSimpleGenparameters, so migrating code fromSimpleGentoFlexGenshould be as simple as renamingG4StdGenerators.SimpleGentoG4StdGenerators.FlexGenin the import statement. The additional featuresFlexGenprovides overSimpleGenare:Ability to generate particle directions in spherical coordinates.
Ability to randomize all variables uniformly over an interval. As an example, suppose one would like the y-coordinate of the particles’ initial position to be distributed uniformly between 0.5m and 1.0m, then rather than setting the
fixed_y_metersvariable, one would set:randomize_y=True random_min_y_meters=0.5 random_max_y_meters=1.0
And finally the ability to specify particle identity via pdg code rather than names, and to generate more than 1 primary particle each event.
Too see all the parameters of
FlexGen, simply run the command:$> sb_g4utils_querygenerator -g G4StdGenerators.FlexGen
ProfiledBeamGen: A generator which generates a beam of particles starting at z=0 and having a given profile in the x-y plane, symmetric around \((x,y)=(0,0)\), unless an offset is given:$> sb_g4utils_querygenerator -g G4StdGenerators.ProfiledBeamGen ParticleGenerator[G4StdGenerators/ProfiledBeamGen]: [dbl] spread_x_mm = 0 [dbl] spread_y_mm = 0 [str] spread_mode = "GAUSSIAN" [dbl] offset_x_mm = 0 [dbl] offset_y_mm = 0 [dbl] offset_z_mm = 0 [dbl] energy_eV = 100 [dbl] neutron_wavelength_aangstrom = 0.028601435349225 [dbl] neutron_wavelength_spread_aangstrom = 0 [dbl] neutron_thermal_spectrum_kelvin = 0 [int] fixed_nparticles = 1 [flg] randomize_nparticles = no [dbl] random_nparticles_poissonmean = 1 [str] particleName = "neutron" [int] pdgCode = 0
It shares the options for setting particle type and number with FlexGen, but for energy, it provides options for either a Gaussian spread in neutron wavelength, or a perfect thermal distribution.
The beam profile is determined by the
spread_...parameters, withspread_x_mmandspread_y_mm(giving the dimensions), andspread_modegiving the type of spread: eitherGAUSSIAN,FLATCIRCULARorFLATRECTANGULAR. TheGAUSSIANmode obviously gives Gaussian distributions with widths ofspread_x_mmandspread_y_mmrespectively, while the other two gives uniform rectangular or ellipsoidal distributions, within an extent also determined byspread_x_mmandspread_y_mm.
Default generator orientation
Note that by convention we try to default all generators to shoot particles in the direction of positive \(z\), starting at \(z=0\) and “near” \((x,y)=(0,0)\). That way, users will be more easily able to switch generators without completely having to re-orient their geometry, rewrite their analyses, etc. Of course, this is not a strict rule, and sometimes a different setup makes sense.
Generating from MCPL files
The G4MCPLPlugins.MCPLGen module
allows one to easily inject particles from MCPL files into a Geant4
simulation. The particles in those files can come from a multitude of sources,
such as MCNP simulations, McStas simulations, or even other Geant4
simulations. Please find more information for how to create, inspect or modify
MCPL files here, on the the official MCPL page at GitHub, or in the published MCPL paper. To use the MCPL generator,
simply import and use the
G4MCPLPlugins.MCPLGen module in
your sim-script, setting at least the input_file
parameter:
import G4MCPLPlugins.MCPLGen as Gen
gen = Gen.create()
gen.input_file = "mydata.mcpl.gz"
Other optional parameters can be used to translate/rotate the coordinate and directions found in the MCPL file before injecting the particles into your Geant4 coordinate system:
gen.dx_meter = 0.1    #translate x coordinates by 10cm
gen.dy_meter = -0.1   #translate y coordinates by -10cm
gen.dz_meter = 10     #translate z coordinates by 10m
gen.rotx_degree = 90  #rotate particle directions 90 degrees around the x axis
gen.roty_degree = -10 #rotate particle directions -10 degrees around the y axis
gen.rotz_degree = 180 #rotate particle directions 180 degrees around the x axis
Finally, the input_filter parameter can be used to select just some of the
particles in the file, by providing a logical expression like in the following
examples (more info about how to construct such filter expressions can be found
here):
# High energy photons only:
gen.input_filter = "ekin > 2.0MeV && pdgcode == 22"

#low energy neutrons only:
gen.input_filter = "is_neutron && neutron_wl > 0.5Aa"

#only neutrons or high energy photons:
gen.input_filter = "is_neutron || (is_photon && ekin > 1MeV)"
Custom generators defined in Python
Wouldn’t it be nice if instead of relying on generators written by other people, you could add a few lines of code in your sim-script to put exactly the particles you want exactly where you want them? It is, fortunately, straight-forward to do exactly that by implementing your own generator:
#!/usr/bin/env python

import G4CustomPyGen
import Core.Units as Units

class MyPyGen(G4CustomPyGen.GenBase):

def declare_parameters(self):
    self.addParameterDouble("energy_MeV",1.0)
    self.addParameterDouble("extent_mm",2.0)
    self.addParameterString("particle_name","neutron")

def init_generator(self,gun):
    gun.set_type(self.particle_name)
    gun.set_direction(0,0,1)

def generate_event(self,gun):
    gun.set_energy(max(0,self.randGauss(1*Units.eV,self.energy_MeV*Units.MeV)))
    y=self.rand(-1.0,1.0)*self.extent_mm*Units.mm
    gun.set_position( 0, y, 0)

gen = MyPyGen()

import G4StdGeometries.GeoSlab as geomodule
geo = geomodule.create()

import G4Launcher
launcher = G4Launcher(geo,gen)
launcher.go()
Note in the example above how a generator implemented in this manner even can
have free parameters (e.g. energy_MeV). Additionally, note that one can of
course choose to put the implementation of the generator class inside an actual
Python module, so it can easily be used in several different simulation
scripts. You can find several examples of that in the
G4CustomPyGen.Examples module.
Histogram-based generators
If you have a 1-dimensional SimpleHists histogram with a
distribution of some quantity, you can sample it during particle generation and
use the sampled value as desired: perhaps for the energy spectrum, or the
initial position of your generated particles if you have a histogram with a
realistic beam profile. So if for instance you have the following histogram
stored in a file example.shist with the key alpha_energy, representing a
distribution of energies in keV of alpha particles:
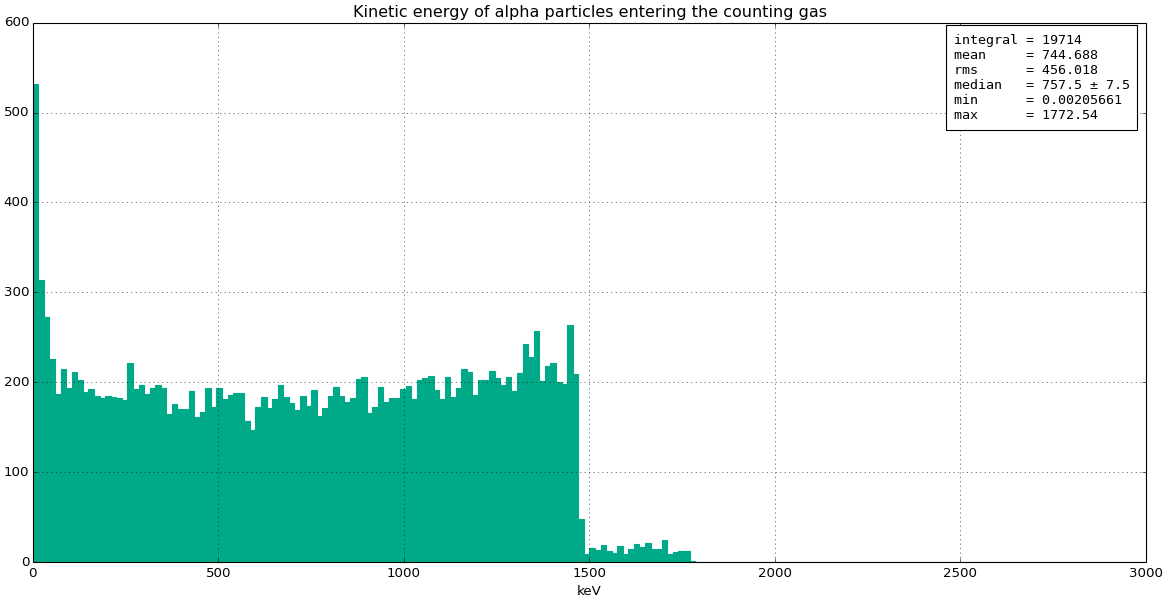
Assuming for simplicity you are happy with all particles starting at \((0,0,0)\) and headed along the positive \(z\)-axis, you can use then use the histogram to implement the following generator:
class AlphaHistGen(G4CustomPyGen.GenBase):

  def declare_parameters(self):
      self.addParameterString('energy_histogram',
                              'G4CustomPyGen/example.shist:alpha_energy:keV')

  def init_generator(self,gun):
      gun.set_type('alpha')
      gun.set_direction(0,0,1)
      gun.set_position(0,0,0)
      self._esampler = self.create_hist_sampler(self.energy_histogram)

  def generate_event(self,gun):
      gun.set_energy(self._esampler())
Note how we specify the input histogram in one single string with syntax
<filename>:<histogramkey>:<unit>, and expose the string as a user-visible
parameter called energy_histogram, allowing users to easily switch histogram
if desired. Here, <filename> can be either the path to the histogram file, or in the form <pkgname>/<file>, if the histogram
file is stored in the data/ directory of some simplebuild package. The
<histogramkey> is used to select which histogram from the file to use, and
the optional <unit> part can be specified either as pure value, or the name
of a unit like eV or keV (see the full list of supported unit names in
Units.hh). The complete string is then passed to
self.create_hist_sampler(..) during initialisation and the returned sampler
is stored as self._esampler, which can be invoked during
generate_event() calls by calling self._esampler(), returning one value
sampled at random from the histogram.
Note that in addition to the actual bin-contents of the histogram, the sampler also considers the min/max statistics as well as any underflow/overflow content. So for instance if the histogram has any overflow content, a single virtual bin is added between the upper bin edge and the maximum value ever filled – and the content of that bin is then the overflow value.
Generating from Griff files
It is possible to use Griff files as a source of particles, by using the G4GriffGen.GriffGen generator module:
import G4GriffGen.GriffGen as Gen
gen = Gen.create()
gen.input_file = 'mygrifffile.griff'
gen.primary_only = True
If primary_only is set to True, Geant4 particles will be generated based
on the pre-step info of the first step of all primary particles found in the
file (thus, it can be used to “re-shoot” the generated events inside a Griff
file). If primary_only is set to False, Geant4 particles will be
generated based on the pre-step info of the first step of all particles in the
file – which is obviously mostly useful when the Griff file was created with a
certain filter to select the particles going into the file (e.g. a volume filter
capturing all particles as they enter a particular volume).